right?
All you have to do is open the Finder, browse to the appropriate folder, click the name of the file, then type in a new name for the file.
At some point, though, you may encounter a more onerous task: renaming 100 files. It’s not that difficult but it is tedious.
If you’re not careful, you might not get all of them right, or you might miss a few, or you might get a call from someone and then come back to the task later, not sure where you left off.
With Automator, you can achieve more by doing less tedious work.
Automator workflows can speed up a tedious and time-consuming task which also removes the possibility of errors while doing those tasks.
Automator is a built-in wizard-like tool that allows you to put together visual workflows. You’ll find that it’s useful in about many of the situations where you need to automate a task.
Let’s start by creating 5 Automator workflows to save your time.
#1. Convert image file formats.
Sometimes you need to convert large numbers of JPEG files to GIFs or GIFs into PNGs. Ordinarily, this kind of work requires that you organize your images, open them one at a time in an image editor, convert them, save them, and move on to the next image.
Well, if that’s the way you’ve handled things in the past, welcome to the world of automation!
To convert images to another file type with Automator, follow these steps:
- Open Automator or choose File➪New from the menu.
- Click Folder Options and then click Choose.
- Drag the Change Type of Images action to the workflow.
- Choose a type to convert your images to BMP, JPEG, JPEG 2000, PICT, PNG, or TIFF
- Now, save your workflow.
Test it out be copying any image files to the folder and it should be immediately converted to the format you have specified.
#2. Cropping and resizing images using automator
Another common scenario is having someone walk up to you and say, “Hey, I’ve got these 300
images that I need to be resized to 400×400 pixels, can you do that? By tonight?” or, “Hey, here’s 500 images, can you crop them so that none of them is wider than 300 pixels? Okay, thanks!”
In the world of image manipulation, there are few tasks more mundane, boring, or repetitive than resizing images. Luckily, you’ve got a whole bunch of great automation tools at your disposal.
In Automator, there’s a workflow action called Crop Images that allows you to resize images to certain dimensions. You can crop by dimension or by percentage,
To crop a group of images, follow these steps:
-
- Open Automator or choose
File➪New from the menu. - Click Application, then click Choose.
- Click Files and Folders under Library and Drag the Create Thumbnail Images action to the workflow.
- Drag the Crop Images action to the application.
- When prompted, be sure to add the Copy Finder Items action to the workflow.
- Open Automator or choose
This step can be ignored unless you want to keep a backup of the original items.
-
- Choose a target folder for your cropped images.
- Select how to crop your images: by dimension or percentage.
A dimensional crop resizes an image to certain widths and/or heights, and works well
if most of your images are the same size, to begin with.
A percentage of crop resizes images by a certain percentage across the board. You might
have bigger images mixed in with smaller ones dimension-wise, but they might all get
a 10 percent crop vertically and a 20 percent crop horizontally, resulting in different
Sizes.
If you’re selecting a percentage crop, choose width and height percentages from
the pop-up menu
If you are running a dimensional crop workflow against a series of images (all of which start off
being different sizes and orientations) results in some interesting crops.
That’s because some images are bigger than others, while others are portrait instead of landscape.
You can set the scale before crop options to any of the values listed below.
-
- Scale to Width. This resizes your images to your width setting and then resizes height accordingly.
- Scale to Height. This resizes your images to your height setting and then resizes width accordingly.
- Scale to Long Side. This resizes images to their long side (that is, they scale to the height if they’re a portrait or to width if they’re landscape) before cropping the short side.
- Scale to Short Side. This resizes images to their short side (that is, they scale to width if portrait or to the height if landscape) before cropping the long side.
Save and run your application.
If you enable the “Show this action when the workflow runs” in step 7, you will be prompted by this window when you run the application.
That’s it. You can see how easy it is to create an application which will crop batch images in no time.
#3. Creating Thumbnails
If you’ have 300 images that need to go up on the eCommerce site by tonight, and each of them needs a little thumbnail.
Fortunately, you can use Automator to speed through this task.
Here’s how to use Automator to create thumbnails:
To crop a group of images, follow these steps:
- Open Automator or choose
- File -> New from the menu.
- Click Application, then click Choose.
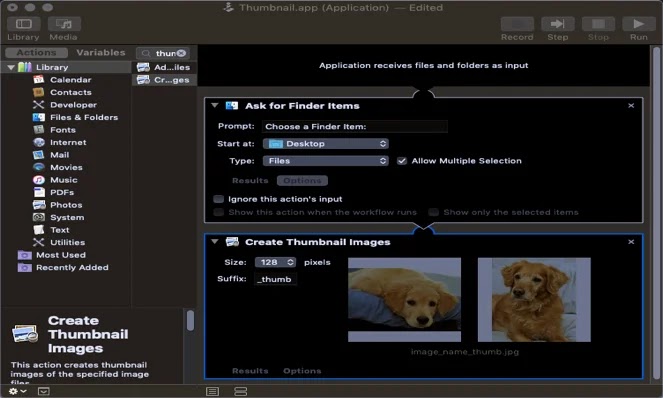
- Click Files and Folders under Library and Drag the Create Thumbnail Images action to the workflow.
- Choose a size (in pixels) for your thumbnails.
- Choose a suffix for your newly created images (such as _thumb)
Save and run your application.

#4. Renaming files
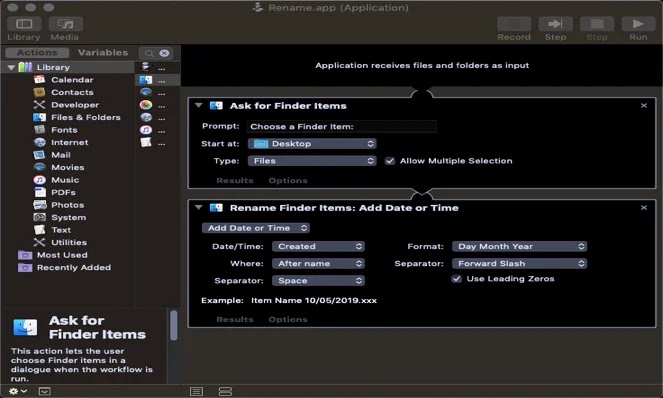
The Rename File Automator application we will create can be used to create sequential file names.
To rename files, follow these steps:
- Open Automator or choose File New from the menu.
- Click Application, then click Choose.
- Click Files and Folders under Library and Drag the Rename finder items action to the workflow.
#5. Trash items older than x days
To remove the clutter of files, follow these steps:
Open Automator or choose
- File →New from the menu.
- Click Application, then click Choose.
- Select Files & Folders in Library.
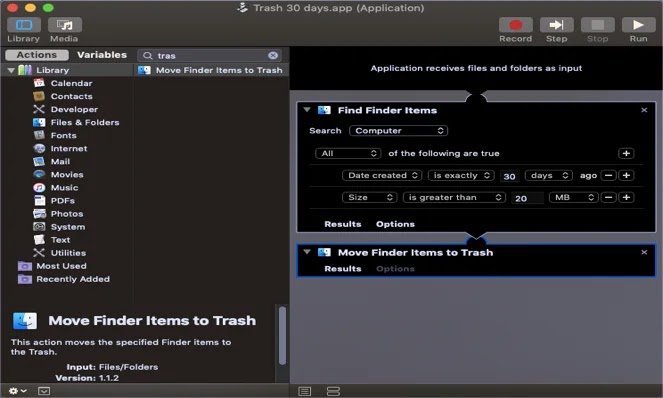
- Drag the Find Finder Items action to the workflow
and hoose your Home folder from the Search pop-up menu. - To find files that were created more than six months ago (because you want to clear out older files), select Date Created from the first pop-up menu, is before in the second pop-up menu, and the appropriate date from the text field.
- Click the + sign to add one more criterion.
- Choose size from the first pop-up menu and is greater than from the second pop-up
menu. - Choose an appropriately large file size, such as 20MB.
- In the action search box (it’s above the second column of actions to the left of the workflow), type the string trash.
- Drag the Move Finder Items to the Trash action to the workflow.
Be cautious about this workflow as you may end up trashing important files as well.


Leave a Reply