If you SSH login to multiple hosts, it becomes a tedious task to remember all hostnames, IP addresses and Password. In this article, I am going to show you how you can SSH Raspberry PI without entering a password. In the first part of the tutorial, I will be showing you how to ssh using private/public key and then creating a permanent alias for the hostname.
SSH is a network protocol for securing data that flows between client and server over the internet. when a client connects to the server, it needs to be verified so that the data can be considered secure.
Authentication Methods for SSH
- Password
- Public/Private key Pair
- Host-Based
One of the methods to authenticate the clients is an exchange of cryptographic keys after the server successfully authenticates the client a tunnelled connection is established then secure shell provides an encrypted file transfer between the client and server.
You can securely execute system command and execute programs in the Raspberry Pi from a Mac
How to ssh with a password works?
From a terminal on Mac type ssh followed by the username. Then you will be prompted for a password for the user account for Raspberry PI.
Let’s say you want to ssh into another raspberry pi then you need to repeat the same procedure of entering the password again on your Mac. If there are many machines to log in to, you need to enter the password multiple times.
How SSH with private key works?
You will generate a cryptographic public/private key pair in advance. The public key is stored on the remote machine and the private key is stored only on the local machine. In order to authenticate, you need to tell ssh key about the public and private key association so that ssh can authenticate the session.
There are many ways you can tell ssh about private key one easy way is to use a software called ssh-agent on a terminal. Ssh add is the command to tell the ssh-agent about your private key.
When pressing enter you will be prompted to enter the passphrase for ssh key. Password and passphrase similar-sounding words but they are actually very different concepts. The passphrase protects the private key on a local machine and is only known by you an never leaves the local machine. This can prevent someone who had improperly gained access to a local machine from using your private key to log into other remote machines. Once, you enter the passphrase on a private machine you are ready to log in to the remote machine, as usual, using the ssh command.
Unlike before now, you are authenticating session with the private key rather than the password. At this point, nothing seems to be gained, however, when you ssh into another machine you are automatically logged in as your private key has already been verified using a passphrase.
I will show you how to use the Public/Private Key Pair for ssh authentication in raspberry pi with Mac
Step 1.Generate the key pairs.
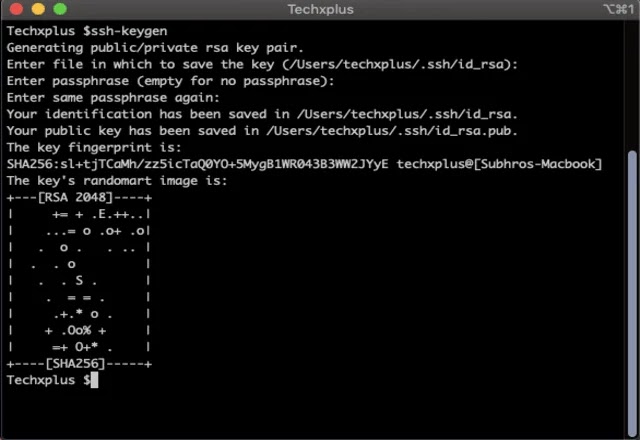
The first step is to generate a public and private key. to do this enter the below command in your terminal.
ssh-keygen
Now, if you look into the ssh directory you can find 3 files as below.
id_rsa is the private key, id_rsa.pub is the public key and the known hosts contains host keys of ssh servers accessed by the user.
id_rsa.pub is the file we have to copy into the raspberry pi.
Step 2.Copy public key to the host system.
To copy the generated public key to the host system you can use the ssh-copy-id command directly.
Though for some of them this command might not be available.
First, I will show you how to copy this file manually into the raspberry pi.
Then, I will show you how to use ssh-copy-id to copy the public key directly to the
First, make sure Raspberry pi has ssh directory or create ssh directory by typing the below command:
mkdir ssh
Now, to copy public key, use the SCP command as below.
scp ~/.ssh/id_rsa.pub pi@192.168.1.6:/home/pi/.ssh/uploaded_key.pub
SCP is a way to copy files to remote machine over ssh. I have copied the file into a new file as uploaded_key.pub. Make sure to provide the correct IP address. My IP address of the PI is 192.168.1.6
Now, We have the key copied into the raspberry pi. We also need to copy the contents of this file into the authorized_key file.
If, you don’t have the authorized key file, don’t worry the below command will create the file or append to it if is already present.
cat ~/.ssh/uploaded_key.pub >> ~/.ssh/authorized_key
Now, we need to make sure the permission for these files is correct.
You can use the below commands to check for file permissions.
stat -c "%a %n" ~/.ssh
stat -c "%a %n" ~/.ssh/*
SSH folder should be set to 700 and files within that folder should be 600.
If your file permission is not as mentioned in above, you can change the file permission by typing the below command.
chmod 700 ~/.ssh/
chmod 600 ~/.ssh/*
Now, you will be able to ssh into raspberry pi without entering the password.
The second method to copy is by using the ssh-copy-id. if you are on mac and don’t have this command install this with the homebrew package manager.
For, more info and installation of Homebrew, refer to the
official website
To install homebrew in MAC, just type in the below command :
brew install ssh-copy-id
Then, to copy public key type in:
ssh-copy-id @192.168.1.6
Even without specifying the key, the command will find id RSA public key
and will ask for a password immediately.
This is the easiest way to copy public key as we need not have to create a folder, manually copy or mess with the file permissions.


Leave a Reply